You plan to go winter camping but want to ensure that your pipes and hold tanks don’t freeze overnight when the temperatures drop. Maybe you want to keep warm air out from under the RV so you can stay cooler in the summer. No matter what, you need an RV skirting solution. What can you use as an RV skirting solution?
RV skirting can be made from foam board, straw bales, snow, vinyl tarps, or insulated tarps. Canvas can be cost-effective but has a lower R-value. Wood is a more permanent solution if you don’t intend to move often. You can also buy custom solutions like snap-on vinyl skirts or inflatable skirts.
If you’ve been racking your brain to figure out what to use for skirting, here’s what you need to know.
What are RV Skirting Solutions?
RV skirting is an essential part of camping in the winter if you want to keep the temperature in your camper as comfortable as possible.
This simple solution prevents cold air and wind from getting underneath the RV, where it can cause pipes and holding tanks to freeze.
Not to mention, it can keep you warmer as the cold air won’t be circulating under where you’re sleeping.
There are many commercial solutions for RV skirting, but there are also many DIY options. Let’s examine some of the most popular options and why you may want to use them.
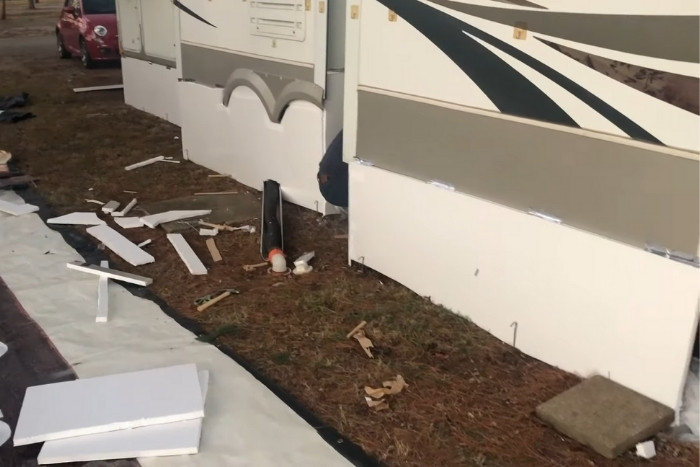
1. Foam Board
An insulated foam board is the first and easiest material for RV skirting. This can be purchased at any home improvement store. You’ll want to ensure that the foam board is as rigid as possible.
Other than that, there is no real science behind choosing the right foam board for RV skirting. One of the reasons campers love using foam board is because it is relatively inexpensive.
This is a great alternative compared to custom solutions purchased on the market. Additionally, it is lightweight and easy to install around the perimeter of your RV.
Remember that you may need additional materials to use the insulated foam board effectively. Some campers need to reinforce the foam board in areas with high winds that can knock the board loose.
In this case, you might want to use plywood to supplement this skirting solution. Aluminum tape can also help to hold the boards together.
You’ll need foam board, plywood, and aluminum tape under the right circumstances. Another thing to remember about using foam board is that storing it can be awkward when not in use.
If you don’t have room on the interior of your RV to store your foam board while traveling or not in use, then you may want to go with a more space-friendly option like vinyl or insulated tarps.
2. Straw Bales
For campers with no intentions of frequently moving this winter, straw bales might be an inexpensive way to insulate your RV with skirting.
Straw bales can be stacked around the edge of the RV to keep cold air from circulating beneath. This is another very cost-effective solution to maximize your budget.
However, you’ll want to know that the straw can pose problems for campers. It’s flammable and could be home to small animals.
Because it’s a warm and insulating material, rodents may want to claim your straw as their new winter home. As a result, you want to tuck each bale into a garbage bag or cover it with a tarp.
If you plan to move frequently, this situation becomes less realistic and can be messy. To move all the straw bales and then rewrap them in a new location. The bales may even fall apart with handling.
You also won’t want to put straw bales inside your RV to move. It’ll make a huge mess. Not to mention, straw bales often attract pests that can then be transferred to the interior of your RV.
No one wants a pest infestation simply from trying to keep their RV warm in the winter weather.
3. Snow
If you were tent camping during the winter, you might decide to build up the area surrounding the tent with a free form of insulation: snow.
Snow is a great windbreak that can trap warm air in the surrounding area. The wind won’t be able to cut through a thick wall of snow.
This makes it a great free option for DIY RV skirting, but it’ll require some labor on your part.
The only downside to using snow for your RV skirting is that you may not know how much of it exists at your campsite.
If you arrive and there’s little to no snow on the ground, you might need to devise another plan on the fly.
Snow also melts as it’s exposed to the sun and the warm afternoon weather, which can mean you need to tend to your RV skirting multiple times throughout the day.
It could be back-breaking labor to shovel snow into position time and again. This is great if your primary goal is to keep your RV warm for the winter.
However, some people prefer skirting year-round because it also traps cool air under the RV. If you fall into this category, you might want to consider investing in a different form of skirting.
4. Vinyl Tarp
Campers who want something that is relatively mobile and cost-effective will want to consider using a vinyl tarp.
You’ll need enough tarp to cover the entirety of the perimeter of your RV, but this is still one of the most budget-friendly options.
Look for tarps that will be easier to install as skirting. For example, some may have grommets to make attaching them to the RV simpler.
If you’re a little crafty about DIY solutions, you can also use Velcro to attach it to the camper.
Remember that you’ll need something to secure the bottom of the tarp on the ground to keep air from circulating beneath the RV.
You can make do with rocks from your campsite, but it’s better to come prepared with small wooden planks that are strong enough to hold the tarp tight in windy conditions.
Another option for securing the tarp to the ground is to use tent stakes or PVC pipe.
Stakes are a bit easier to store and can be the preferred option if you intend to move around often and will need to pack up your skirting.
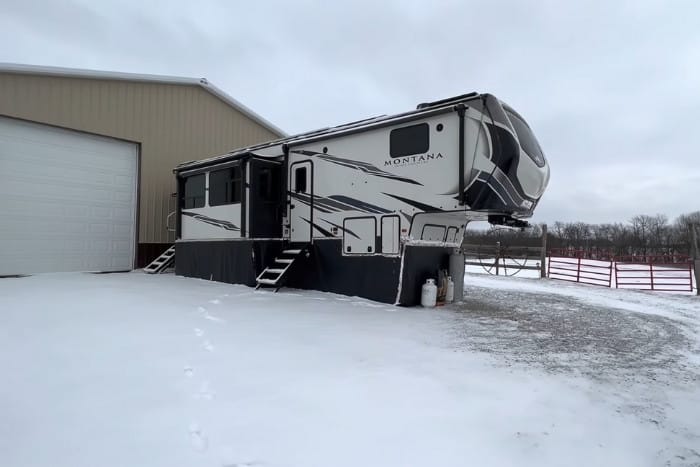
5. Insulated Tarps
Supposing you have a little extra money to spend on your RV skirting solution, you may want to consider investing in insulated tarps.
While these tarps are a bit pricey, they can make a big difference in the R-value compared to standard tarps. Other than this difference, they function much the same as regular tarps.
You’ll need to find a way to attach an insulated tarp to the RV, whether that’s through Velcro or suction cups. You’ll also need something to anchor the tarps to the ground.
If you’ve got a large RV with a lot of square footage that needs to be covered, you’ll need to budget accordingly. While this is a great investment if you need more warmth, it’ll cost you an arm and a leg.
An alternative to insulated tarps that can be a little bit cheaper if you can find it is used billboard vinyl.
This material is thicker than standard tarps and is durable, making it a greater bargain for a budget-conscious camper needing heavy-duty RV skirting.
Both of these will still need to be secured at the bottom, so plan to invest in a few more items, such as wood planks, PVC pipes, or tent stakes.
Stakes are the most cost effective and easiest to store when not in use.
6. Wood
If you’re planning on a more permanent solution for your RV skirting, plywood is a great option.
You’ll need to invest in the tools to cut the wood to size, but it creates a more custom solution that’s quite effective.
The downside of using wood for your RV skirting is that it’s expensive, time-consuming, and less mobile.
It’ll take some time to cut it to size and find a way to secure it to your RV (which may involve building a frame around the bottom of the camper).
Wood is also a more expensive choice for skirting when compared to vinyl tarps or insulated foam boards.
Campers who plan to move around a lot may not want to use wood. It’s time-consuming to install, heavy to remove, and awkward to store in the RV for travel purposes.
If you lack the space or don’t want something mostly permanent, you’ll want to consider another option.
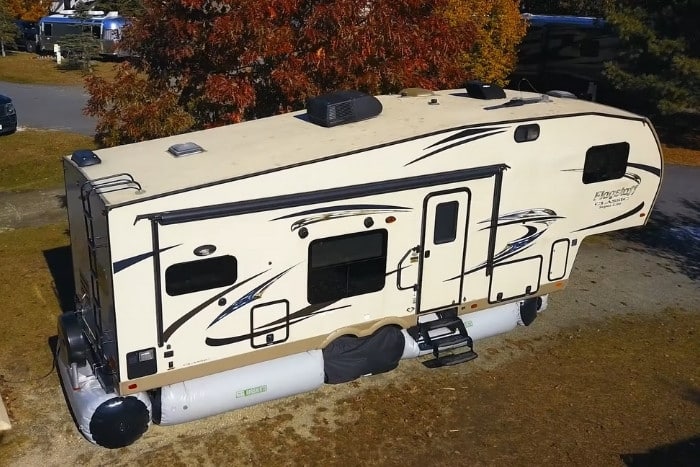
7. Inflatable Skirting
For those who don’t mind investing their RV skirting, inflatable options offer a quick and easy solution. This skirting traps warm air under the RV while simultaneously acting as a barrier against the cold air.
It takes just a few minutes to set up, and it’ll seal your RV up to protect pipes and hold tanks.
Most of the well-known brands of inflatable skirting are modular systems that allow you to buy the exact sizes you need to close off the underneath of your RV.
You’ll need enough tubes to cover every inch of the perimeter of your RV. Be mindful of the heights as well.
The inflatable skirting will blow up and press firmly against the edge of the perimeter of the RV. This makes it impossible for cold air to whip through the underbelly of the camper.
While this is not a DIY solution, it’s a great option for those with the budget. It doesn’t require any modifications to your camper, such as adding snaps.
It also is quite compact for storing it when not in use.
Consider it a worthwhile investment in the warmth and comfort of your RV that can be used year-round to keep the camper cooler in the summer and warmer in the winter.
8. Canvas
Cloth might not be as effective as some of the other options listed here, but it’s an inexpensive alternative if the temperatures are only mild. If you plan to use cloth, canvas is the preferred option.
It’s a bit thicker than standard cloth and can provide a little more insulation, but you should remember that the R-value will be lower on canvas than with tarps or insulated tarps.
Using cloth means you’ll have to make permanent modifications to your RV. You’ll need to install snaps, Velcro, or some other system to attach it to the perimeter of the camper.
Don’t forget that you’ll still need to secure the bottom of the canvas to the ground. Otherwise, the cold wind will whip through the fabric and get up under the RV.
This means that you’ll either need to be reliant on rocks at the campsite, or you’ll need to purchase wood to anchor the canvas. Tent stakes are also a useful option.
Another downside to using cloth is that insects and rodents may chew on it. This can lead to holes that are not just unsightly but allow the cold air to come in.
9. Custom Vinyl Snap-On Skirts
Campers who intend to use their skirting for the long haul may want to invest in a commercial option that promises easy installation and effective air blocking. These are often known as vinyl snap-on skirts.
They can be custom-made for your RV, ensuring that you have the perfect dimensions to accommodate every angle of the camper.
However, the downside is that they need a way to attach to your camper.
Some RV owners try to glue on the snaps that attach the vinyl to the camper, but this is often an ineffective method. The snaps frequently fall off and cause gaps in your skirting.
If you have the budget for a custom vinyl snap-on skirt, you should also plan to spend money to have the snaps drilled into the RV for added security.
These snaps will be a permanent part of your RV, so don’t take this decision lightly. If you want a solution that is easy to remove and install, this could be a great option for campers with a budget.
If not, you may consider whether a DIY solution, like attaching an insulated tarp with Velcro or suction cups, may be the better fit.
Final Thoughts
If you want to keep your camper more comfortable no matter the season, you’ll need RV skirting around the perimeter.
Fortunately, there are tons of DIY and store-bought solutions that you can use to keep air out from underneath the RV.
Some are cost-effective, like foam boards or tarps, but others are more custom solutions. Consider how much you have to spend to figure out which skirting solution is the best fit for you.